このページとあなたの好きなAIアシスタントを使ってドキュメントを要約します
バージョン履歴
- "Solid の useIntlayer API の使用法を直接プロパティアクセスに更新"v8.9.02026/5/4
- "initコマンドを追加"v8.0.02025/12/30
- "履歴の初期化"v5.5.102025/6/29
このページのコンテンツはAIを使用して翻訳されました。
英語の元のコンテンツの最新バージョンを見るIf you have an idea for improving this documentation, please feel free to contribute by submitting a pull request on GitHub.
GitHub link to the documentationCopy doc Markdown to clipboard
Intlayerを使用してAngular 19 (Webpack)ウェブサイトを翻訳する | 国際化 (i18n)
目次
代替手段ではなく Interlayer を使用する理由
「ngx-translate」や「angular-l10n」などの主要なソリューションと比較して、Intlayer は次のような統合された最適化を備えたソリューションです。
Angular を完全にカバー
Intlayer は、コンポーネント レベルのコンテンツ スコープ、遅延読み込み、および国際化 (i18n) のスケーリングに必要なすべての機能を提供することにより、Angular と完全に連携するように最適化されています。
バンドルサイズ
大量の JSON ファイルをページにロードするのではなく、必要なコンテンツのみをロードします。 Intlayer は、バンドルとページのサイズを最大 50% 削減するのに役立ちます。
保守性
アプリケーションのコンテンツのスコープを設定すると、大規模なアプリケーションの メンテナンスが容易になります。コンテンツ コードベース全体を確認するという精神的な負担を負うことなく、単一の機能フォルダーを複製または削除できます。さらに、Intlayer は完全に型指定されており、コンテンツの正確性を保証します。
AI エージェント
コンテンツを同じ場所に配置すると、大規模言語モデル (LLM) によって 必要なコンテキストが削減されます。 Intlayer には、翻訳の欠落をテストする CLI、LSP、MCP などのツール スイートも付属しています。および エージェント スキル により、AI エージェントの開発者エクスペリエンス (DX) がさらにスムーズになります。
オートメーション
AI プロバイダーの費用で、選択した LLM を使用して CI/CD パイプラインで自動化を変換します。 Intlayer は、コンテンツ抽出を自動化する コンパイラー と、バックグラウンドでの翻訳を支援する Web プラットフォーム も提供します。
パフォーマンス
大量の JSON ファイルをコンポーネントに接続すると、パフォーマンスと反応性の問題が発生する可能性があります。 Intlayer は、ビルド時のコンテンツの読み込みを最適化します。
非開発によるスケーリング
Intlayer は単なる i18n ソリューションではなく、自己ホスト型 ビジュアル エディター と 完全な CMS を提供します。 リアルタイムで多言語コンテンツを管理できるようになり、翻訳者、コピーライター、その他のチーム メンバーとのコラボレーションがシームレスになります。コンテンツはローカルおよび/またはリモートに保存できます。
AngularアプリケーションにIntlayerをセットアップするためのステップバイステップガイド
GitHubで アプリケーションテンプレート を確認する。
依存関係のインストール
npmを使用して必要なパッケージをインストールします:
bashコードをコピーコードをクリップボードにコピー
npm install intlayer angular-intlayernpm install @angular-builders/custom-webpack --save-devnpx intlayer initプロジェクトの構成
アプリケーションの言語を構成するための設定ファイルを作成します:
intlayer.config.tsコードをコピーコードをクリップボードにコピー
import { Locales, type IntlayerConfig } from "intlayer"; const config: IntlayerConfig = { internationalization: { locales: [ Locales.ENGLISH, Locales.FRENCH, Locales.SPANISH, // その他のロケール ], defaultLocale: Locales.ENGLISH, }, }; export default config;この構成ファイルを通じて、ローカライズされたURL、ミドルウェアのリダイレクト、クッキー名、コンテンツ宣言の場所と拡張子、コンソールでのIntlayerログの無効化などを設定できます。利用可能なパラメータの完全なリストについては、構成ドキュメント を参照してください。
Angular構成へのIntlayerの統合
IntlayerをAngular CLIと統合するには、カスタムビルダーを使用する必要があります。このガイドでは、Webpack(多くのAngularプロジェクトのデフォルト)を使用していることを前提としています。
まず、カスタムWebpackビルダーを使用するように
angular.jsonを変更します。buildおよびserveの構成を更新します:angular.jsonコードをコピーコードをクリップボードにコピー
{ "projects": { "your-app-name": { "architect": { "build": { "builder": "@angular-builders/custom-webpack:browser", // replace "@angular-devkit/build-angular:application", "options": { "customWebpackConfig": { "path": "./webpack.config.ts", "mergeStrategies": { "module.rules": "prepend" }, }, "main": "src/main.ts", // replace "browser": "src/main.ts", // ... }, }, "serve": { "builder": "@angular-builders/custom-webpack:dev-server", }, }, }, },}angular.json内のyour-app-nameを実際のプロジェクト名に置き換えてください。次に、プロジェクトのルートに
webpack.config.tsファイルを作成します:webpack.config.tsコードをコピーコードをクリップボードにコピー
import { mergeConfig } from "angular-intlayer/webpack";export default mergeConfig({});mergeConfig関数は、Intlayerを使用してWebpackを構成します。IntlayerPlugin(コンテンツ宣言ファイルを処理するため)を注入し、最適なパフォーマンスのためのエイリアスを設定します。コンテンツの宣言
翻訳を保存するためのコンテンツ宣言を作成および管理します:
コンテンツ宣言は、
contentDirディレクトリ(デフォルトは./src)に含まれ、コンテンツ宣言ファイルの拡張子(デフォルトは.content.{json,ts,tsx,js,jsx,mjs,cjs,md,mdx,yaml,yml})に一致していれば、アプリケーション内のどこでも定義できます。詳細については、コンテンツ宣言のドキュメント を参照してください。
コード内でのIntlayerの利用
Angularアプリケーション全体でIntlayerの国際化機能を利用するには、アプリケーションの構成でIntlayerを提供する必要があります。
src/app/app.config.tsコードをコピーコードをクリップボードにコピー
import { ApplicationConfig } from "@angular/core";import { provideRouter } from "@angular/router";import { provideIntlayer } from "angular-intlayer";import { routes } from "./app.routes";export const appConfig: ApplicationConfig = { providers: [ provideRouter(routes), provideIntlayer(), // ここにIntlayerプロバイダーを追加 ],};その後、任意のコンポーネント内で
useIntlayer関数を使用できます。src/app/app.component.tsコードをコピーコードをクリップボードにコピー
import { Component } from "@angular/core";import { RouterOutlet } from "@angular/router";import { useIntlayer } from "angular-intlayer";@Component({ selector: "app-root", standalone: true, imports: [RouterOutlet], templateUrl: "./app.component.html", styleUrl: "./app.component.css",})export class AppComponent { content = useIntlayer("app");}テンプレート内では以下のようになります:
src/app/app.component.htmlコードをコピーコードをクリップボードにコピー
<div class="content"> <h1>{{ content().title }}</h1> <p>{{ content().congratulations }}</p></div>Intlayerのコンテンツは
Signalとして返されるため、シグナルを呼び出すことで値にアクセスします:content().title。コンテンツの言語を変更する
オプションコンテンツの言語を変更するには、
useLocale関数によって提供されるsetLocale関数を使用できます。これにより、アプリケーションのロケールを設定し、それに応じてコンテンツを更新できます。言語を切り替えるためのコンポーネントを作成します:
src/app/locale-switcher.component.tsコードをコピーコードをクリップボードにコピー
import { Component } from "@angular/core";import { CommonModule } from "@angular/common";import { useLocale } from "angular-intlayer";@Component({ selector: "app-locale-switcher", standalone: true, imports: [CommonModule], template: ` <div class="locale-switcher"> <select [value]="locale()" (change)="setLocale($any($event.target).value)" > @for (loc of availableLocales; track loc) { <option [value]="loc">{{ loc }}</option> } </select> </div> `,})export class LocaleSwitcherComponent { localeCtx = useLocale(); locale = this.localeCtx.locale; availableLocales = this.localeCtx.availableLocales; setLocale = this.localeCtx.setLocale;}次に、このコンポーネントを
app.component.tsで使用します:src/app/app.component.tsコードをコピーコードをクリップボードにコピー
import { Component } from "@angular/core";import { RouterOutlet } from "@angular/router";import { useIntlayer } from "angular-intlayer";import { LocaleSwitcherComponent } from "./locale-switcher.component";@Component({ selector: "app-root", standalone: true, imports: [RouterOutlet, LocaleSwitcherComponent], templateUrl: "./app.component.html", styleUrl: "./app.component.css",})export class AppComponent { content = useIntlayer("app");}
TypeScriptの構成
Intlayerはモジュール拡張(Module Augmentation)を使用して、TypeScriptの利点を活用し、コードベースをより強力にします。
TypeScript構成に自動生成された型が含まれていることを確認してください。
コードをクリップボードにコピー
{ // ... 既存のTypeScript構成 "include": [ // ... 既存のTypeScript構成 ".intlayer/**/*.ts", // 自動生成された型を含める ],}Git構成
Intlayerによって生成されたファイルは無視することをお勧めします。これにより、それらをGitリポジトリにコミットすることを避けることができます。
これを行うには、.gitignore ファイルに以下の指示を追加します:
コードをクリップボードにコピー
# Intlayerによって生成されたファイルを無視.intlayerVS Code拡張機能
Intlayerでの開発体験を向上させるために、公式の Intlayer VS Code Extension をインストールできます。
この拡張機能は以下を提供します:
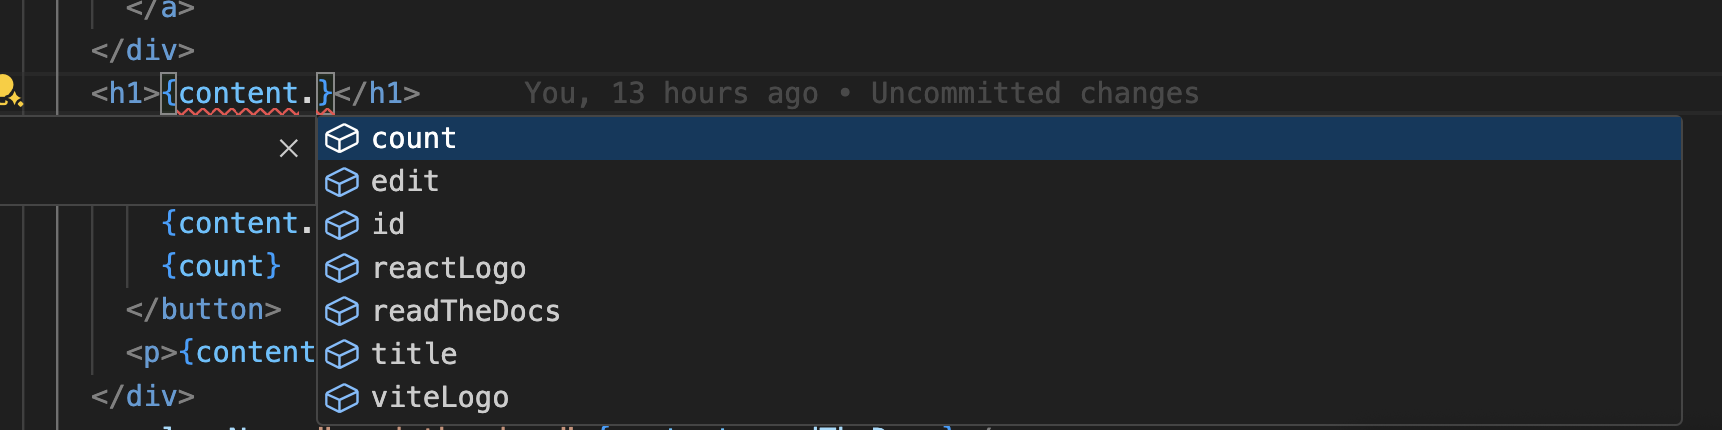
- 翻訳キーの オートコンプリート。
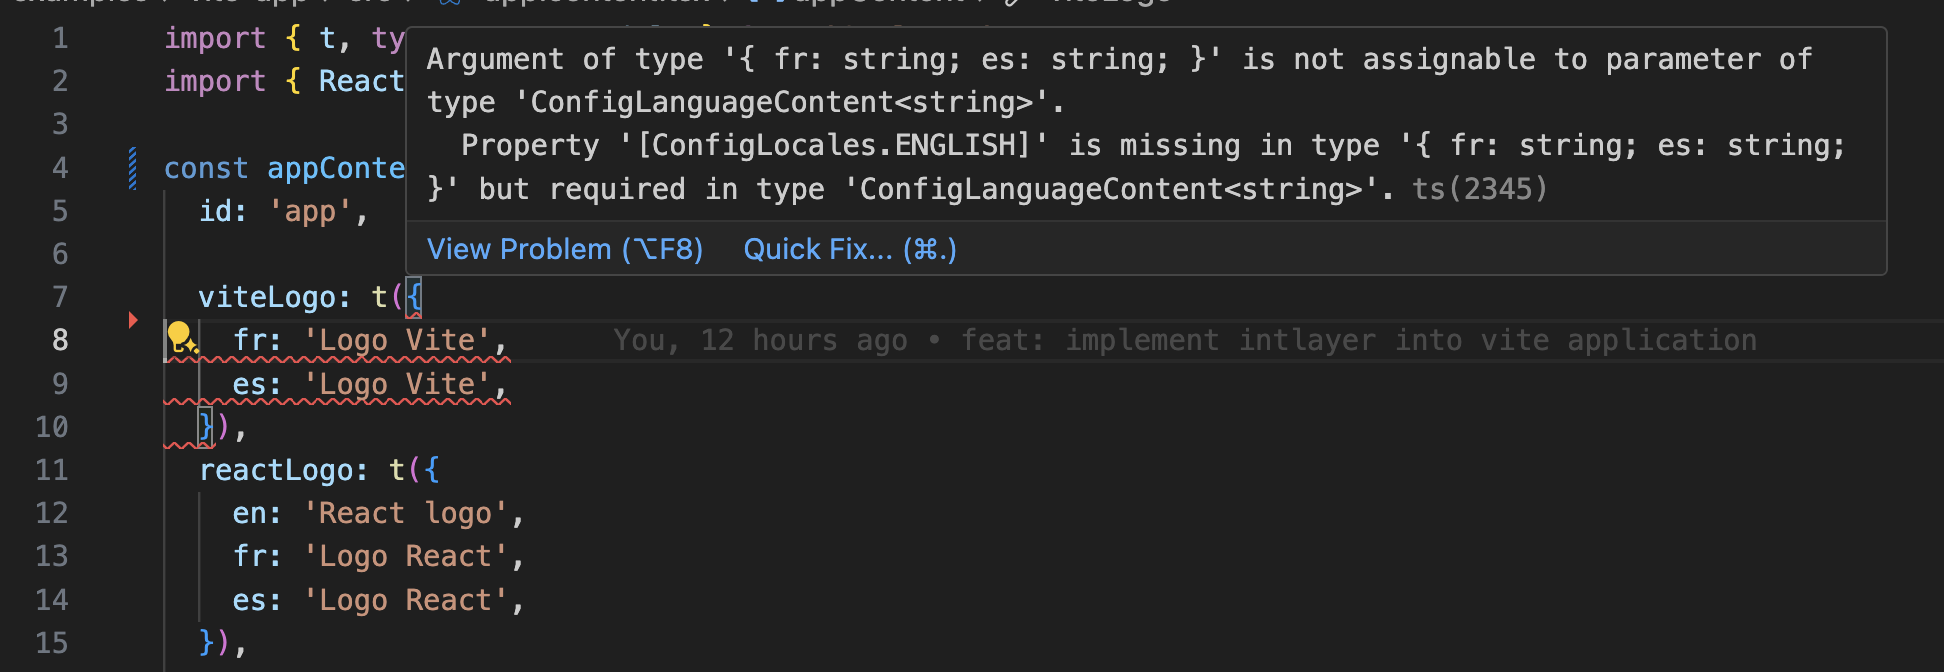
- 翻訳漏れの リアルタイムエラー検出。
- 翻訳済みコンテンツの インラインプレビュー。
- 翻訳を簡単に作成・更新するための クイックアクション。
拡張機能の使用方法の詳細については、Intlayer VS Code Extension ドキュメント を参照してください。
さらに詳しく
さらに詳しく知るには、ビジュアルエディター を実装するか、CMS を使用してコンテンツを外部化することができます。